Apple Silicon MacOS 開發者環境設置流程

前言

每年 mac 系統大更新的時候,我都會習慣將系統全部重新進行安裝,但是一直以來都沒有好好紀錄,安裝後所需要建立的開發環境流程,常常想到什麼就做什麼,因此我時常需要做環境設定 Debug,這次就趁著更新的順手就把這些流程完整紀錄下來,作為自己的 SOP,以下是我最終設定後的樣貌!

安裝 iTerm2

  1. 前往 iTerm2 官網進行下載、安裝

  2. iTerm2 設置

    1. 設置 Command Line 無限滾動紀錄

      → 方便回去追尋執行指令紀錄。

    2. 修改 Color Scheme
      如果調整個人風格色調,可以到 Preferences > Profiles > Colors 這邊設定,我個人是使用 Pastel (Dark Background),如果對於預設的幾個 Scheme 不滿意,也可以到 iTerm2-Color-Schemes 尋找您喜歡的 Scheme Clone 下來,再到 Color Presets import 進去。

    3. 修改 iTerm2 外觀風格

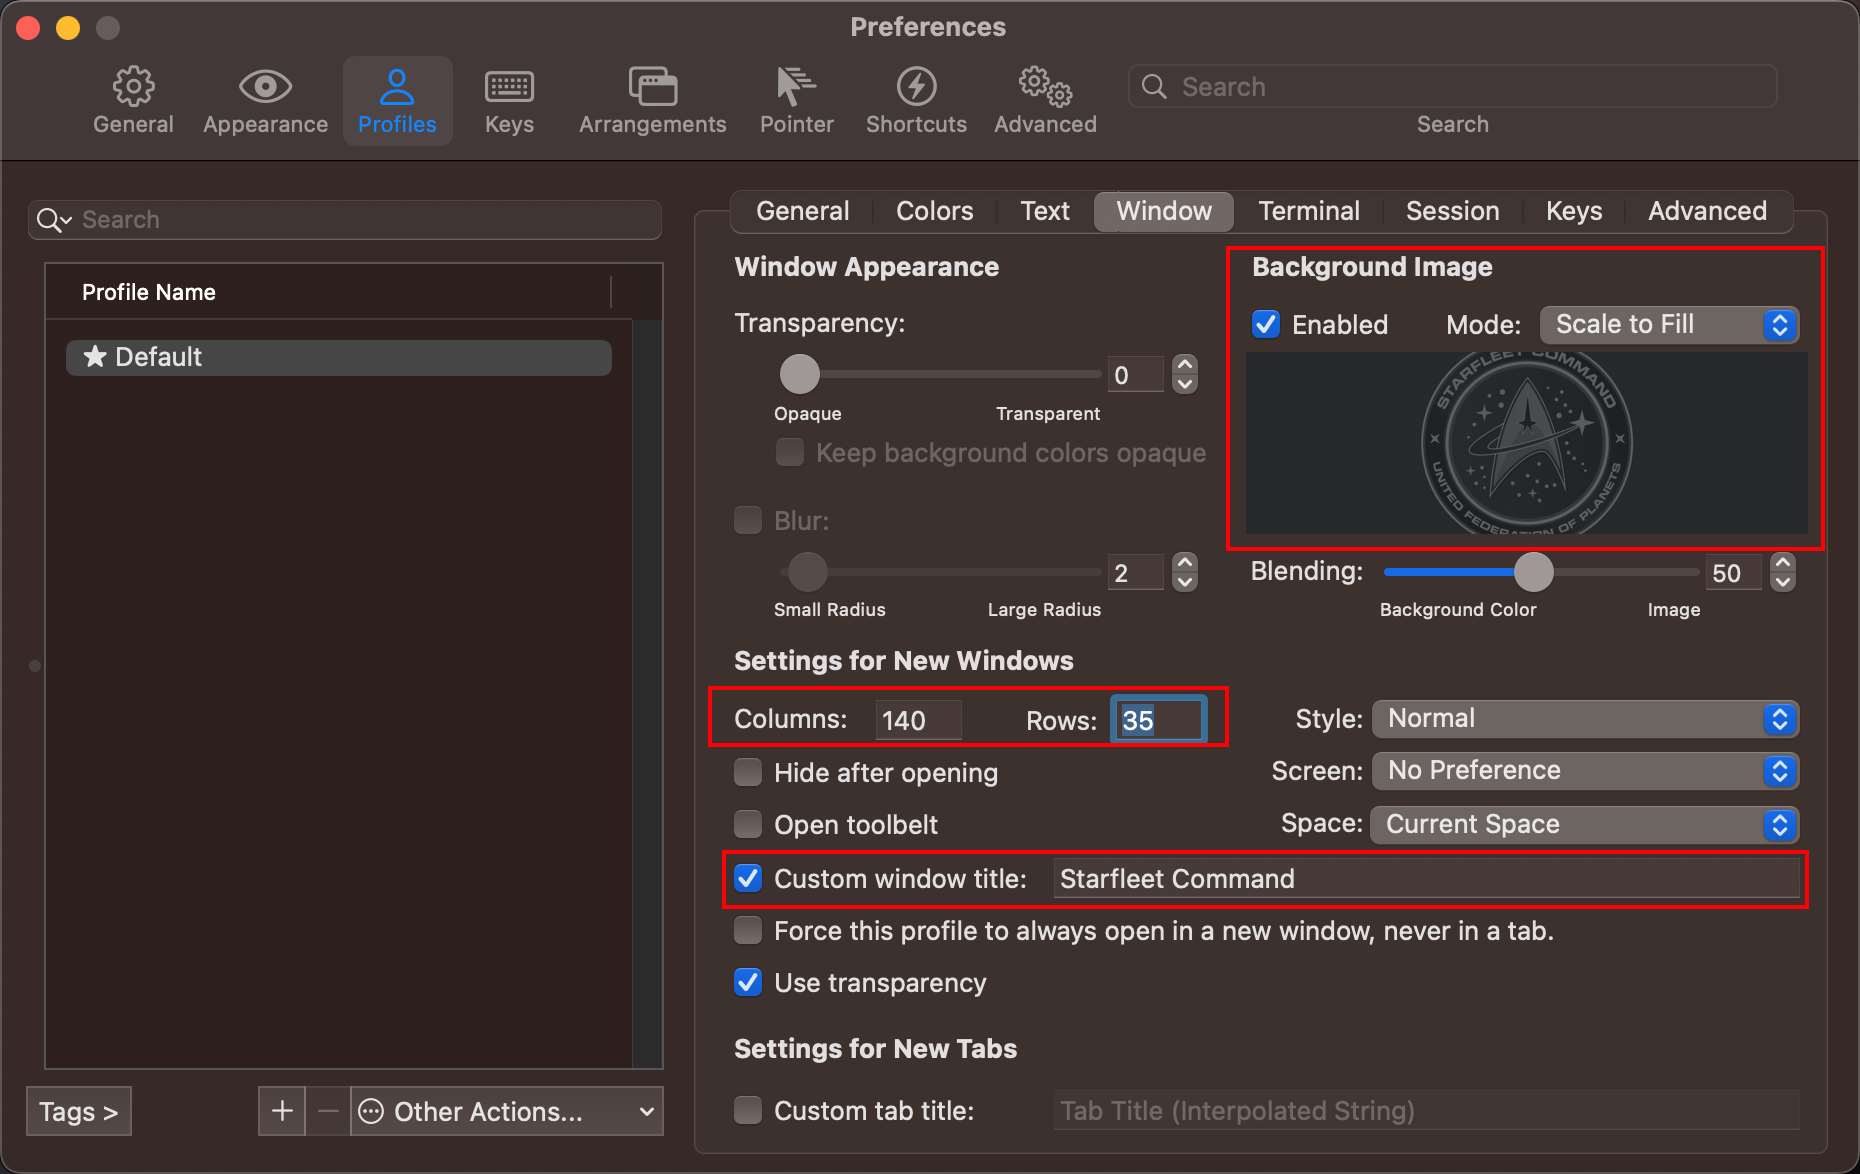
      由於我個人蠻喜歡 Star Trek 的,所以我會將整個 iTerm2 外觀稍作修飾。

      • Background Image 可以設置 Window 背景,首選影像最好選用 Png 檔。
      • Columns、Rows 則是設置 Window 的尺寸大小,這邊的單位 Columns 是用字元,Rows 則是用行列。
      • Custom window title title 則是設置 Window 的名稱。
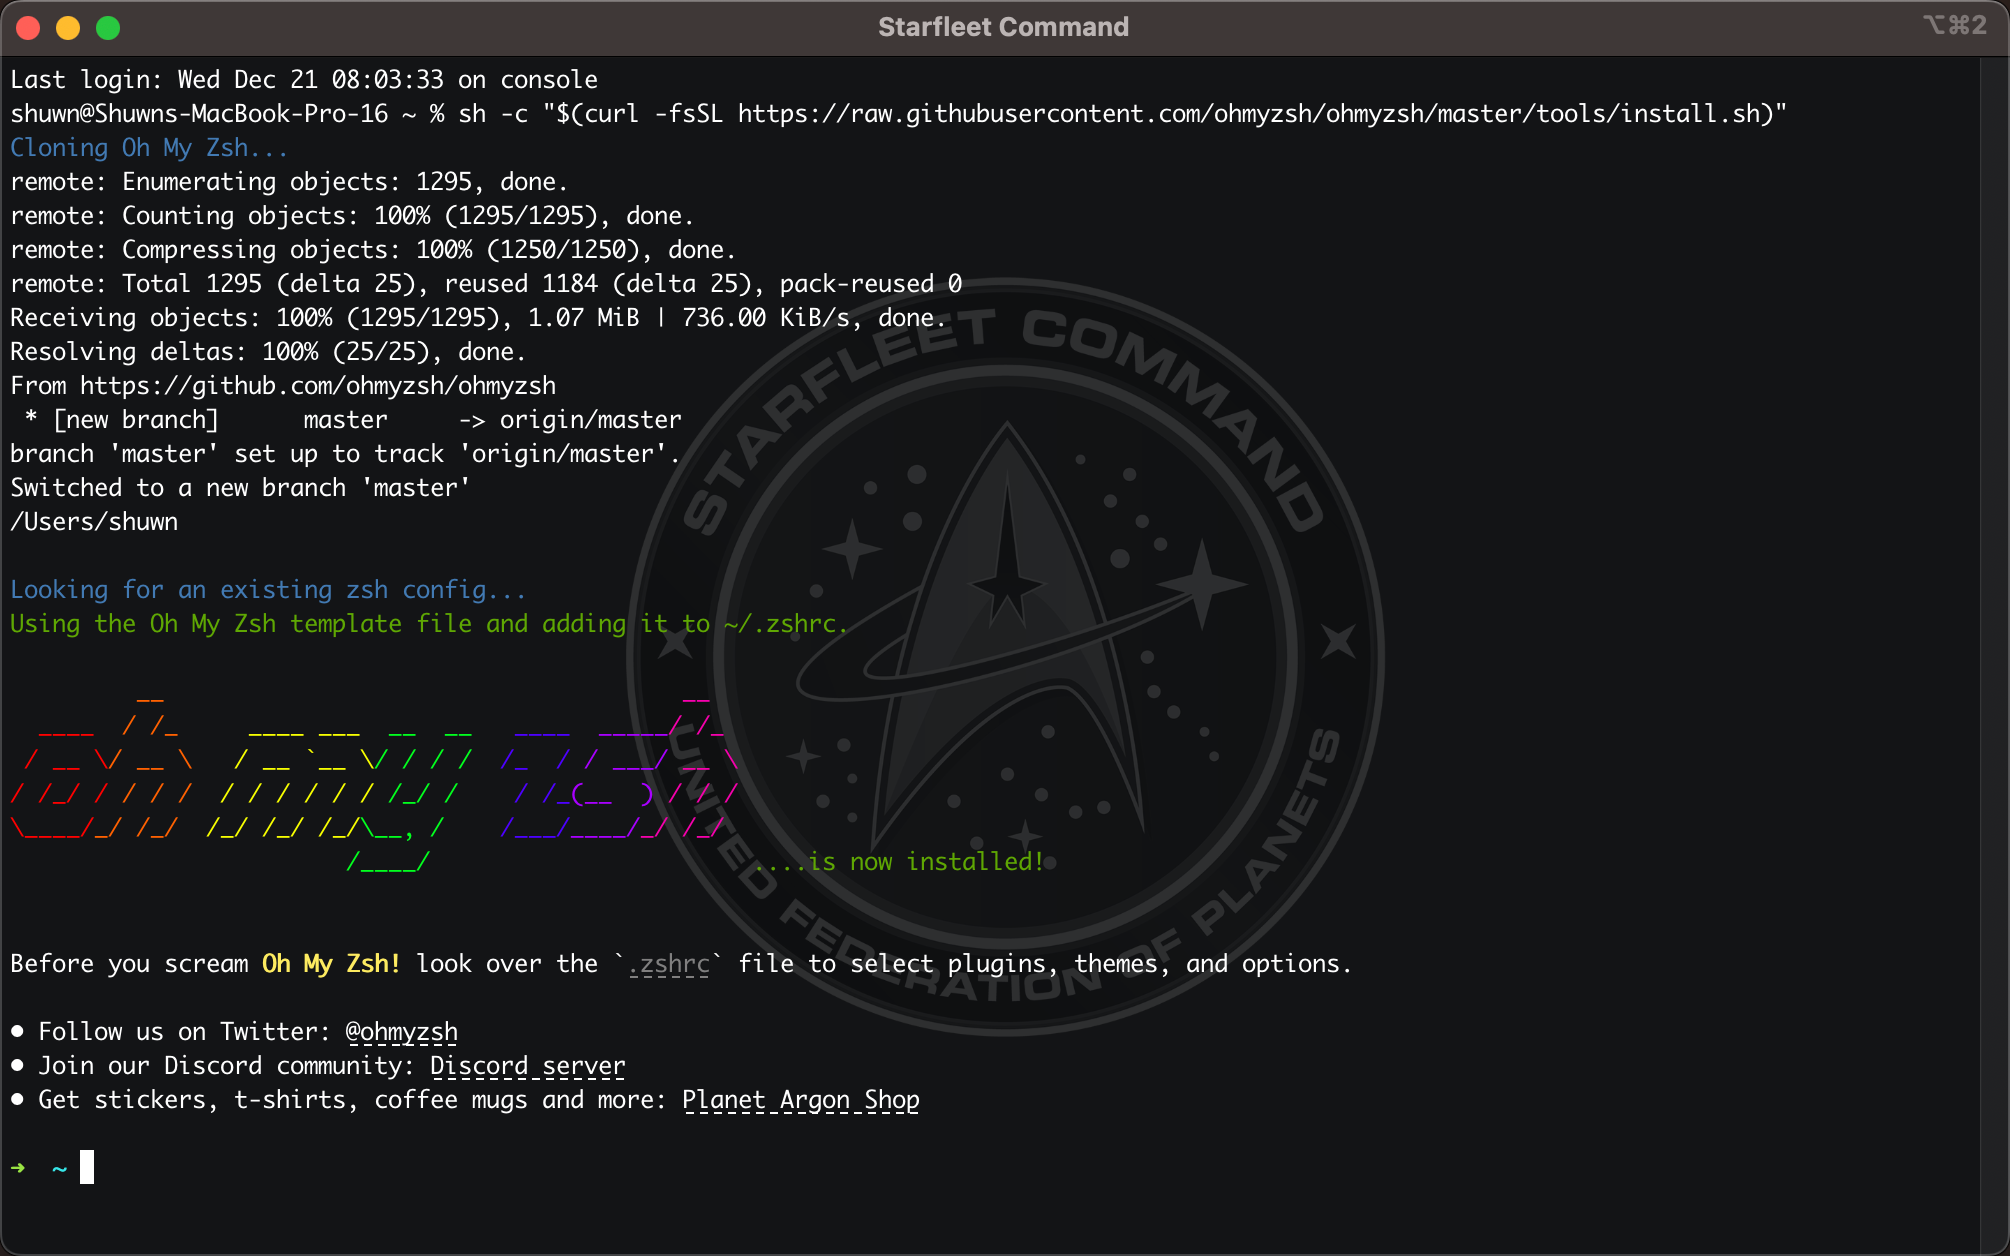
      對照上方所設置的結果,顯示的 Window 風格如下。

    4. 讓 Alfred 支援 iTerm2

      1
      2
      3
      4
      5
      6
      7
      8
      9
      10
      11
      12
      13
      14
      15
      16
      17
      18
      19
      20
      21
      22
      23
      24
      25
      26
      27
      28
      29
      30
      31
      32
      33
      34
      35
      36
      37
      38
      39
      40
      41
      42
      43
      on alfred_script(q)
      if application "iTerm2" is running or application "iTerm" is running then
      run script "
      on run {q}
      tell application \"iTerm\"
      activate
      try
      select first window
      set onlywindow to true
      on error
      create window with default profile
      select first window
      set onlywindow to true
      end try
      tell the first window
      if onlywindow is false then
      create tab with default profile
      end if
      tell current session to write text q
      end tell
      end tell
      end run
      " with parameters {q}
      else
      run script "
      on run {q}
      tell application \"iTerm\"
      activate
      try
      select first window
      on error
      create window with default profile
      select first window
      end try
      tell the first window
      tell current session to write text q
      end tell
      end tell
      end run
      " with parameters {q}
      end if
      end alfred_script

安裝 Homebrew

輸入以下指令。

1
/bin/bash -c "$(curl -fsSL https://raw.githubusercontent.com/Homebrew/install/HEAD/install.sh)"

對於 Apple Silicon 的 Mac,當安裝完成後需要再額外輸入以下指令做對應的 PATH 連結。

1
2
echo ‘eval $(/opt/homebrew/bin/brew shellenv)’ >> /Users/alisonyang/.zprofile
eval $(/opt/homebrew/bin/brew shellenv)

最後我們再輸入 brew -v,確認其安裝、設置完成。

安裝 oh-my-zsh

由於 macOS Catalina (10.15) 開始預設 zsh 作為默認的 shell,為了更加便利進行 zsh 組態設定,所以會另外安裝 oh-my-zsh 來管理 zsh

安裝 oh-my-zsh 方式很簡單,可以透過 curlwget 指令進行安裝,參考指令如下:

Method Command
curl sh -c "$(curl -fsSL https://raw.githubusercontent.com/ohmyzsh/ohmyzsh/master/tools/install.sh)"
wget sh -c "$(wget -O- https://raw.githubusercontent.com/ohmyzsh/ohmyzsh/master/tools/install.sh)"

安裝完成後呈現的畫面應該如下。

安裝 zsh Theme: powerlevel10k

當上述 zsh 設置完成後,我會對於 Command Line 再做進一步美化,個人習慣使用 powerlevel10k,它是一個漂亮而且簡單易用的 zsh Theme,強烈推薦大家安裝使用。

安裝方式非常簡單,只要輸入以下指令。

1
2
git clone --depth=1 https://github.com/romkatv/powerlevel10k.git ~/powerlevel10k
echo 'source ~/powerlevel10k/powerlevel10k.zsh-theme' >>~/.zshrc

接下來輸入 source ~/.zshrc,重新啟動 zsh,就會出現下方設定介面,後續就依照訊息按照自己的需求設置 Command Line 的風格,強烈推薦安裝使用他們所推薦 Meslo Nerd Font喔!

當所有設置完成後,使用 Command+Q 將 iTerm2 完全關閉,再重新啟動,powerlevel10k 會依照您所做的設定自動套用在 iTerm2 中,而你對 powerlevel10k 所做的設置會儲存在 ~/.p10k.zsh,在 ~/.zshrc 後方中會多增加了一段 PATH,作為 zsh Therm 的引用。

1
2
3
4
source ~/powerlevel10k/powerlevel10k.zsh-theme

# To customize prompt, run `p10k configure` or edit ~/.p10k.zsh.
[[ ! -f ~/.p10k.zsh ]] || source ~/.p10k.zsh

客製化 Prompt Segment

接下來我們再針對 Command Line 的 Prompt Segment 做更進一步細緻化的調整。

Command Line 輸入 open ~/.p10k.zsh,打開 .p10k.zsh 檔案。

分別找到以下參數

  • POWERLEVEL9K_LEFT_PROMPT_ELEMENTS → 代表 Command Line 左邊的 Prompt Segment 顯示內容。
  • POWERLEVEL9K_RIGHT_PROMPT_ELEMENTS → 代表 Command Line 右邊的 Prompt Segment 顯示內容。

大家可以依照自己開發環境需求進行調配,當然也可以任意安插或調整順序。

1
2
3
4
5
6
7
8
9
10
11
12
13
14
15
16
17
18
19
20
21
22
23
24
25
26
27
28
29
30
31
32
33
34
35
36
37
38
39
40
41
42
43
44
45
46
47
48
49
50
51
52
53
54
55
56
57
58
59
60
61
62
63
64
65
66
67
68
69
70
71
72
73
74
75
76
77
78
typeset -g POWERLEVEL9K_LEFT_PROMPT_ELEMENTS=(
os_icon # os identifier
dir # current directory
vcs # git status
# prompt_char # prompt symbol
)

# The list of segments shown on the right. Fill it with less important segments.
# Right prompt on the last prompt line (where you are typing your commands) gets
# automatically hidden when the input line reaches it. Right prompt above the
# last prompt line gets hidden if it would overlap with left prompt.
typeset -g POWERLEVEL9K_RIGHT_PROMPT_ELEMENTS=(
status # exit code of the last command
command_execution_time # duration of the last command
background_jobs # presence of background jobs
direnv # direnv status (https://direnv.net/)
asdf # asdf version manager (https://github.com/asdf-vm/asdf)
virtualenv # python virtual environment (https://docs.python.org/3/library/venv.html)
anaconda # conda environment (https://conda.io/)
pyenv # python environment (https://github.com/pyenv/pyenv)
goenv # go environment (https://github.com/syndbg/goenv)
nodenv # node.js version from nodenv (https://github.com/nodenv/nodenv)
nvm # node.js version from nvm (https://github.com/nvm-sh/nvm)
nodeenv # node.js environment (https://github.com/ekalinin/nodeenv)
# node_version # node.js version
# go_version # go version (https://golang.org)
# rust_version # rustc version (https://www.rust-lang.org)
# dotnet_version # .NET version (https://dotnet.microsoft.com)
# php_version # php version (https://www.php.net/)
# laravel_version # laravel php framework version (https://laravel.com/)
# java_version # java version (https://www.java.com/)
# package # name@version from package.json (https://docs.npmjs.com/files/package.json)
rbenv # ruby version from rbenv (https://github.com/rbenv/rbenv)
rvm # ruby version from rvm (https://rvm.io)
fvm # flutter version management (https://github.com/leoafarias/fvm)
luaenv # lua version from luaenv (https://github.com/cehoffman/luaenv)
jenv # java version from jenv (https://github.com/jenv/jenv)
plenv # perl version from plenv (https://github.com/tokuhirom/plenv)
perlbrew # perl version from perlbrew (https://github.com/gugod/App-perlbrew)
phpenv # php version from phpenv (https://github.com/phpenv/phpenv)
scalaenv # scala version from scalaenv (https://github.com/scalaenv/scalaenv)
haskell_stack # haskell version from stack (https://haskellstack.org/)
kubecontext # current kubernetes context (https://kubernetes.io/)
terraform # terraform workspace (https://www.terraform.io)
# terraform_version # terraform version (https://www.terraform.io)
aws # aws profile (https://docs.aws.amazon.com/cli/latest/userguide/cli-configure-profiles.html)
aws_eb_env # aws elastic beanstalk environment (https://aws.amazon.com/elasticbeanstalk/)
azure # azure account name (https://docs.microsoft.com/en-us/cli/azure)
gcloud # google cloud cli account and project (https://cloud.google.com/)
google_app_cred # google application credentials (https://cloud.google.com/docs/authentication/production)
toolbox # toolbox name (https://github.com/containers/toolbox)
context # user@hostname
nordvpn # nordvpn connection status, linux only (https://nordvpn.com/)
ranger # ranger shell (https://github.com/ranger/ranger)
nnn # nnn shell (https://github.com/jarun/nnn)
lf # lf shell (https://github.com/gokcehan/lf)
xplr # xplr shell (https://github.com/sayanarijit/xplr)
vim_shell # vim shell indicator (:sh)
midnight_commander # midnight commander shell (https://midnight-commander.org/)
nix_shell # nix shell (https://nixos.org/nixos/nix-pills/developing-with-nix-shell.html)
vi_mode # vi mode (you don't need this if you've enabled prompt_char)
# vpn_ip # virtual private network indicator
# load # CPU load
# disk_usage # disk usage
# ram # free RAM
# swap # used swap
todo # todo items (https://github.com/todotxt/todo.txt-cli)
timewarrior # timewarrior tracking status (https://timewarrior.net/)
taskwarrior # taskwarrior task count (https://taskwarrior.org/)
# cpu_arch # CPU architecture
time # current time
# ip # ip address and bandwidth usage for a specified network interface
# public_ip # public IP address
# proxy # system-wide http/https/ftp proxy
# battery # internal battery
# wifi # wifi speed
# example # example user-defined segment (see prompt_example function below)
)

zsh Plugins 設置

另外我們可以再安裝一些 Plugins 來讓 zsh 更加好用,以下是我常用的 Plugins。

程式碼語法突顯 (Syntax Highlighting)

安裝指令如下:

1
brew install zsh-syntax-highlighting

安裝完成後會顯示以下安裝路徑,以下為範例。

接下來再輸入指令打開 .zshrc 檔案。

1
open ~/.zshrc

在最後面空白處依照安裝時顯示的路徑插入以下範例內容。

1
2
# For zsh syntax-highlighting
source $(brew --prefix)/share/zsh-syntax-highlighting/zsh-syntax-highlighting.zsh

最後再執行 source ~/.zshrc 重新啟動 zsh 即可。

Command Line 自動建議 (Auto Suggestions)

安裝指令如下:

1
brew install zsh-autosuggestions

安裝完成後會顯示以下安裝路徑,以下為範例。

接下來再輸入指令打開 .zshrc 檔案。

1
open ~/.zshrc

在最後面空白處依照安裝時顯示的路徑插入以下範例內容。

1
2
# For zsh autosuggestions
source $(brew --prefix)/share/zsh-autosuggestions/zsh-autosuggestions.zsh

最後再執行 source ~/.zshrc 重新啟動 zsh 即可。

另外補充一點,如果對於預設的顏色、樣式不喜歡,可以至其安裝路徑進行微調設置,如上圖安裝資訊所示,我的安裝路徑為 /opt/homebrew/share,可以在其資料夾的 zsh-autosuggestions.zsh 找到 ZSH_AUTOSUGGEST_HIGHLIGHT_STYLE='fg=8'進行修改。

ZSH_AUTOSUGGEST_HIGHLIGHT_STYLE=‘fg=8' 的設定值中,’fg=8’ 其設定值範圍為 0 ~ 255,也可依照色碼表填寫相對應的值,此外也可以設置文字樣式 e.g. 粗體、底線等,以下為設置範例,大家可以依照自己的喜好進行修改。

1
ZSH_AUTOSUGGEST_HIGHLIGHT_STYLE="fg=#ff00ff,bg=cyan,bold,underline"

輸入指令自動完成 (completions)

安裝指令如下:

1
brew install zsh-completions

安裝完成後會顯示以下安裝路徑,以下為範例

接下來再輸入指令打開 .zshrc 檔案

1
open ~/.zshrc

在最後面空白處依照安裝時顯示的路徑插入以下範例內容

1
2
3
4
5
6
7
# For zsh completions
if type brew &>/dev/null; then
FPATH=$(brew --prefix)/share/zsh-completions:$FPATH

autoload -Uz compinit
compinit
fi

然後需要重建 zcompdump,輸入以下指令

1
rm -f ~/.zcompdump; compinit

最後再執行 source ~/.zshrc 重新啟動 zsh 即可。

如果出現以下錯誤

需要在 Command Line 輸入以下指令,最後再執行 source ~/.zshrc 重新啟動 zsh 即可解決。

1
chmod -R go-w "$(brew --prefix)/share/zsh"

後續只要在 Command Line 輸入關鍵字,再按下 Tab (⇥) 鍵,就可以快速選取指令。

以上就是我的基本開發環境設置流程。